
Tools are available from any track window. They are used to add, modify, and delete MIDI data. Before you can use anything more than the factory installed tools, you need to know how to manage them.
This window, available from the Windows->Tools menu item of any song or track window, displays a list of all the tools installed on your system. From the Tool menu you can create, modify, or delete tools. Any tool that is not in any of the tool bars found in the track windows is not available for use -- add a tool to a tool bar by dragging it from the Manage Tools window to the desired position in the tool bar.
The Manage Tools window is similar to a Tracker window, and displays a list of tools and their attributes. By default, the Manage Tools window displays the name and a short description of each installed tool. The attributes are:
Descriptions of all the installed tools is available in Appendix B: The Tools.
6.1.1. Menu Bar
Tool
6.2. Sharing Tools
Tools are stored as files on your hard drive, so they can be shared easily with other users. A tool can be stored in one of two directories:
All tools located in the first folder can not be modified, and appear as light gray in the Manage Tools window. By default, all tools that ship with Sequitur are located in this read-only directory. Use the path attribute of the Manage Tools window to locate a particular tool.
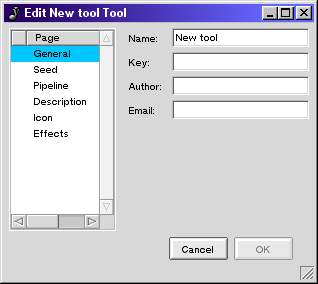
The Edit Tool window is accessed by opening the Manage Tools window and either double-clicking an existing tool or selecting Tool->New. This window is divided into six pages: General, Seed, Pipeline, Description, Icon and Effects. The General page contains several required pieces of information; after that, the Seed and Pipeline are the most important pages. In very broad terms, tools operate by using a seed to translate mouse gestures into MIDI events, then feeding those events to the pipeline.
6.3.1. The General Page
This page allows you set the tool's name, key, author and author's email. The author and email fields are optional, but each tool must have at least a name and a key. Ideally, each tool has a unique name, since this is the label seen by users.
Each tool is required to have a unique key, which is what Sequitur uses to distinguish between tools. Keys should be given the pattern of "[implementor:tool_name]"; for example, all Angry Red Planet tools have an implementor of "arp", so the default Pencil tool's key is "arp:Pencil". The Edit Tool window will prevent you from using a key already in use. Additionally, for any tools that share the same key, only the first one loaded will be available from the tool bars of a track window.
6.3.2. The Seed Page
Seeds translate mouse gestures into MIDI events. Each seed has its own rules, so familiarity with these rules are a basic first step for understanding and writing tools. First, let's look at a quick example: The difference between the Select tool and the Eraser tool. When the Select tool is used, it draws a highlight box from the first point the mouse was clicked to where it was released. When the Eraser tool is used, the mouse is pressed and held, and every event that the mouse touches is deleted. This illustrates the basic difference between two seeds. The seed used by the Select tool draws a box, and does no processing until the mouse is released. The seed used by the Eraser tool immediately processes every event the mouse hits.
Seeds are set on a per-view basis. Above the Seed: menu button is a list of all the installed views in your system. The views are presented in a tree -- setting a seed for an item in the tree also applies that seed to all children of that item. Most tools should only need to set a seed at the All Views level, although some, like the Pencil tool, do a great deal of customization for different views.
All seeds contain at least a single property, Scroll. If this property is enabled, the view will scroll if the user drags beyond its bounds. The current version of Sequitur contains the following seeds:
This seed can behave differently after the mouse is pressed based on the After adding event: property. The Move selection will cause the current selection to drag with the mouse; Continue adding keeps creating and processing new events; Transform selection transforms the new event and any other selections based on the rules of the view (see the transform seed description); Refilter selection keeps eliminating the new event, readding it, and sending the selection to the pipeline (see the refilter seed description).
This seed is used extensively by the Pencil, with different properties set for different views. A good way to understand this seed is to copy the Pencil and examine the settings for each view.
In the hybrid note and piano roll views, dragging left and right change note duration, dragging up and down change velocity. In the tempo view, dragging up and down changes the tempo. In the control change, pitch bend, and after touch views, dragging up and down changes the respective value.
There is an additional property that determines whether or not the transformation happens on the current selections (En masse) or each event encountered (One by one).
6.3.3. The Pipeline Page
The tool can have any number of pipelines. If it has none, it will just perform the default seed behaviour (the create seed will create events, the box seed select them, etc.). This is not terribly interesting, since the basic tools do a fine job of using all the seeds.
The pipelines use Input and Output filters to interact with the active tracks in the track window that's using the tool. If you have one or more pipelines in your tool, all pipelines together must have a minimum of one Input and one Output filter. These filters are added automatically whenever you press the Add button to add a new pipeline.
The Input filters determine which of the active tracks will supply input to the tool. The Output filters determine which of the active tracks will be given the resulting events. The simplest example is a tool whose pipeline has a single Input and single Output filter. In this case, the primary track is always used to supply input, and all output is sent to the primary track. All of the ARP Basic tools have at most one pipeline, so their behaviour is indicative of this system.
A more complex example is a tool with a single Input filter and multiple Output filters. In this case, the primary track again supplies all data that gets sent to the tool, but what happens after that depends on how many output filters and how many ordered tracks exist. The Output filters correspond to the ordered tracks, so the first ordered track -- the primary track -- receives all data that spits out of the first Output filter. If there is a second ordered track, as signified by a "2" next to the track name in the active tracks menu, it receives any events from the second Output filter, and so on. The same pattern is used in the case that their are multiple Input filters. If there are more Output filters than ordered tracks, the addition events are ignored.
Note: A tool with a single Input and single Output filter is a special case. All ordered tracks are processed separately, just like the tool was being supplied a list of primary tracks.
6.3.4. The Description Page
This page lets you type in two separate descriptions. The short description, which appears in the description column of the Manage Tools window, should be a brief explanation of the tool. The long description should be HTML-formatted text that explains in detail the tool's operation. It appears in Appendix B: The Tools.
6.3.5. The Icon Page
Users identify tools by their icon that appears in the tool bars. This icon editor is an extremely simply paint program provided as a convenience for touching up icons. It is highly recommended that you do any real work in an application which you can copy to and paste from, such as QuickRes. The only tools available for drawing are the pencil, which paints the current colour, and the dropper, which reads the color.
The Copy and Paste menu commands can be used to transfer the icon to and from a better paint program. Copy and paste works fine with Be's QuickRes application, and may work with other BeOS paint programs.
The Flip Horizontally and Flip Vertically menu commands mirror the icon around the x and y axis, respectively.
The Fill with Alpha command fills every pixel in the icon with at most the current alpha value (if the pixel's alpha is already below the current alpha, it is left alone). This option is mainly used for devices.
6.3.6. The Effects Page
Effects are simple graphical polish that don't have any real effect on the tool. The only effect currently available is the fading line effect, used by the Wand tool in the control change strip view. Effects are applied on a per-view basis, in the same way that the seed is.
6.4. Example 1
In this example, we'll create a tool that selects all notes on or above E3.
1. Create a new tool by selecting Tool->New from the Manage Tools window. Type "Example1" in the Name: field and something unique, like "ex:Example1", in the Key: field.
2. Click on the Seed page, click on the All Views row, then change the Seed: menu button to Box.
3. Click on the Pipeline page. By default, there is a single pipeline with Input and Output filters. Open a Filters window by selecting Windows->Filters from a song or track window. Click on the Keyboard Splitter filter, and drag it between the Input and Output filters. You can double-click on the Keyboard Splitter in your tool pipeline now to verify the split point, which is E3.
4. Click OK. Your tool should appear in the Manage Tools window.
Now, open a track window and drag your new tool from the Manage Tools window to a tool bar in your track window (hovering just after the last tool in a tool bar then releasing will add your tool to the end of the tool bar). Activate the Pencil tool and place some notes down, making sure to enter notes both above and below E3. Activate your Example 1 tool and box select the notes you just placed down -- you should see that only the notes on or above E3 are actually selected.
6.5. Example 2
In this example, we'll modify the tool from section 6.4. to send all notes below the E3 split point to a different track, thereby splitting one track into two.
1. Open the Manage Tools window and double-click the tool created in section 6.4.
2. Click on the Pipeline page and then press the Add button. Your tool should now have two pipelines.
3. Put the mouse over the In filter in the second pipeline. A property button appears in the upper left corner -- click on it and select Remove. For this tool, we want a single In filter on the first pipeline, and an Out filter on each of the tool pipelines.
4. Put the mouse over the Keyboard Splitter filter in the first pipeline. Notice the purple dot that appears immediately right of the filter? Click on it and drag to the Out filter in the second pipeline. The Keyboard splitter should now have two pipelines coming out -- the default one that goes to the Out filter immediately right of it, and a new one that branches down to the Out filter on the pipeline below it. Click OK to accept the tool.
Now, let's see this tool in action Open a track window and add some notes, some above C3 and some below. The crucial part: In the Track: menu button in the upper right of the track window, click on it and go to a different track (i.e. one without the checkmark), navigate to that track's submenu, and select the 2 sub menu item. You now have two tracks active in this track window, which will be signified if you click on the Track: menu button again -- the primary track, the one the window is named after, has a checkmark. The second track has a 2 next to it. The primary track corresponds to the first Output filter in any active tool, the second track to the second Output filter.
Activate your newly modified Example tool. Again, select the notes you placed down, but watch the song window as you do this -- you'll see all notes below E3 get moved to the second track.


