RECORDING
MIDIPunch In/Punch Out
Automation
Audio
Tempo
Songs
MIDI
To record to a track, you need to do three basic things: Add an input FX, enable the track to record, and press the transport Record button.
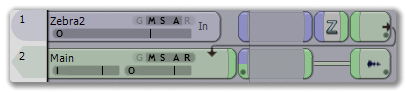 |
| The Zebra2 MIDI track is not ready to record. Can you guess what's missing? |
The input FX is located between the track mode buttons and the phrases area. A track with no input will have an empty FX named In, otherwise it will have an FX with the input name. If the track has no input or you'd like a different input, either right-click the input FX or drag from the FX browser tab, then select the desired input from the list. It's possible you'll want to configure the input: For example, you might have an input for a MIDI device and want to receive from a specific channel, or you might want to record from specific channels of an audio device. Left-click on the input FX to open the parameter view, then configure as desired.
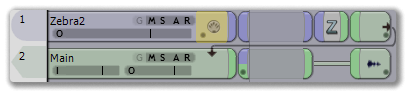 |
| Right-o, now we have an input. That's one... |
The record mode button is directly left of the input FX, a small 'R' that is red when active.
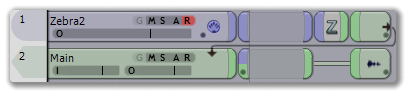 |
| ...and now record mode is engaged. That's two. |
With an input selected and the track's record on, the transport record button should become enabled. Click to begin recording.
Punch In / Punch Out
Select a specific range of the song to perform a punch in / punch out recording. You can select the range by clicking in the song ruler and dragging for the desired area. If you want don't want a range, click in empty space to clear any selection before pressing the transport Record button.
AUTOMATION
Automation refers to the edits made while manipulating knobs in a VST window. By opening a VST for editing, enabling Automation record in the track (located next to the Solo/Mute buttons), and pressing song's Record button, you'll capture any changes you make to knobs in the VST.
Automation changes are stored as controller data. If you'd like realtime feedback of changes you've made, double-click the track in the phrases area and locate the desired controller (if you've already recorded automation data, it will either be available as one of the tab buttons, or in the 'Hidden' section of the controller list). Once the automation controller is active, click on the outer edge of the colour control and drag to set the transparency level for the controller data in the song view. Now, with the controller info being displayed in the track overview, any changes you make while recording will be instantly visible.
AUDIO
Audio track recording is identical to MIDI track recording: Make sure the track has an input, engage the track's record mode, and press the transport Record button. Like MIDI tracks, audio tracks use the current selection range (if any) as the punch in / punch out point.
TEMPO
Tempo can be recorded by using the Tempo Tap FX. Placing this FX after a MIDI input will convert taps on your MIDI keyboard into tempo information, which can be recorded in the song.
SONGS
To record your song, you need an audio track that includes all audio in your song. By default, new Temper songs are created with the Main buss track and all audio is sent to this track, so nothing more is needed then engaging Record mode on the track and pressing the Record transport button.
(If this Main buss track is missing, you can add it by selecting Tracks->Add Audio Track->Main Buss. After you've done this, you need to send every track with an audio output to the Main buss by dragging the FX browser tab to the track output, selecting Buss Out, then clicking the new Buss Out FX and selecting Main from the Busses Select button.)
When the song is recorded, you can solo the Main buss track to hear the recording.
Note that by default the Main buss track has a special property: It will always record into the same audio file each time you run it, so there's no need to delete the audio phrase when you're ready to make a new recording.